
Some Photography Tips for Phone Users
You’re driving home from work and you see the most incredible sunset after a thunderstorm. You pull out your phone and take what is sure to be the next Pulitzer Prize winning photo. Only to get home and the photo you took is unrecognizable. What went wrong?
Note: There is no TL;DR on this post. You’re just going to have to read it. I started writing this over a year ago, but the advice still stands.
Photographers love their equipment and they love arguing about which brands are best. You can have a full-frame camera with the best lens money can buy, but it does you no good if you don’t have it when you need it.
The best camera is the one in your hand when you need to take a photo. In most cases, that camera is probably your phone. I’m going to go down the rabbit hole for a while to explain a few concepts and then we’ll pop out and talk about specific things you can do to take better photos with your phone. Please bear with me.
Equipment
Let’s get started with the two most important pieces of equipment you have. Your eyes and your brain. Your eyes have great ability to adapt to the available lighting and sense subtle variations in color. As we age, that ability changes, which is where our brains take over. Our brains adjust the signals that our eyes see and process the visuals in a way that we expect or desire. It does this without us needing to do anything.
There are many analogues between our eyes, our brain, and camera equipment. It’s one of the reasons that pieces of gear have the same names as those in our heads, such as iris and lens. However, the digital version of our eyes and brains don’t have the ability to override what we think we’re seeing. And that’s where the disappointment you experience when you look at that photo later comes in.
Fortunately, we have post-processing. Or, as Snapchat and dozens of other apps call “filters”. We’ll get to that in a bit.
Film/Sensor Sizes
In the film days, we mostly used either a 35mm camera or what were commonly known as a “110” cartridge. A 35mm negative (or slide) was 35mm along the diagonal from one corner to the opposite side. 35mm is approximately 1 3/8”. Whereas, the 110 cartridge was about 21mm along the diagonal. While the 110 format was convenient, the lack of controls in the cameras usually meant that 110 photos were mostly low quality with poor coloring and “grain” in the image. Further, because the frame size was so much smaller than 35mm, it wasn’t possible to enlarge the photos beyond a 5”x7” print (roughly equivalent to an A5 sheet).
A modern consumer-grade digital camera, such as a Canon EOS or a Nikon D Series probably has an APS-C sensor in it. There are some variations, but most of these sensors are about the equivalent of 25mm. Unlike the 110 film cartridge, a modern digital sensor can record a great amount of detail in that space. However, as you try to extract more information out of the sensor (MORE MEGAPIXELS) you get “noise” in the signal, which is the equivalent of grainy film.
The Point Being…
I talk about this because the sensor in your phone is usually about 10mm (.4”) on the diagonal. Further, the lenses on your camera have to fit in the depth of the phone, which is already thin to begin with. Quite clearly, the sensor size being smaller means you’re going to get more noise in your photos, with the insistence that marketing people have to promote this years’ thing being better than last years’ thing, you’ll see that the noise is just being amplified.
These physical limitations will impact your photos, but with a little bit of thought and preparation, you can take photos that you can post on Facebook, crop tightly to get the best composition, and enlarge to print on a full sheet of paper.
So, let’s get started.
Composing Your Photos
The Rule (or Guideline) of Thirds
We’ll start with one of the most basic, and most used, concepts–the Rule of Thirds. It’s not a Rule in the sense that it must be obeyed at all costs. It’s more of a guideline. There are plenty of good reasons to ignore it, but in the absence of a good reason, you can’t go wrong in following it.
Here’s the gist. Take any scene and divide it into a grid with two equally-spaced lines horizontal and two lines vertical. These lines will divide the scene into nine panels of equal size. Take whatever you’re interested in the most, and put it along one of those grid lines. It doesn’t necessarily have to be at the intersection of the grid, just along the grid line. Then, put the rest of the scene into the other two-thirds of the scene to give it context. Granted, you’ll have to zoom in or out a bit. Perhaps you’ll need to move a bit to bring your subject into the best possible framing. This requires a bit of practice and thought, but it’s a simple concept.
Here’s an example. I took this shot in November 2007. It’s a tree on a hill near a friends’ house, taken as the sun was setting. It’s a bit under-exposed, but that’s alright.
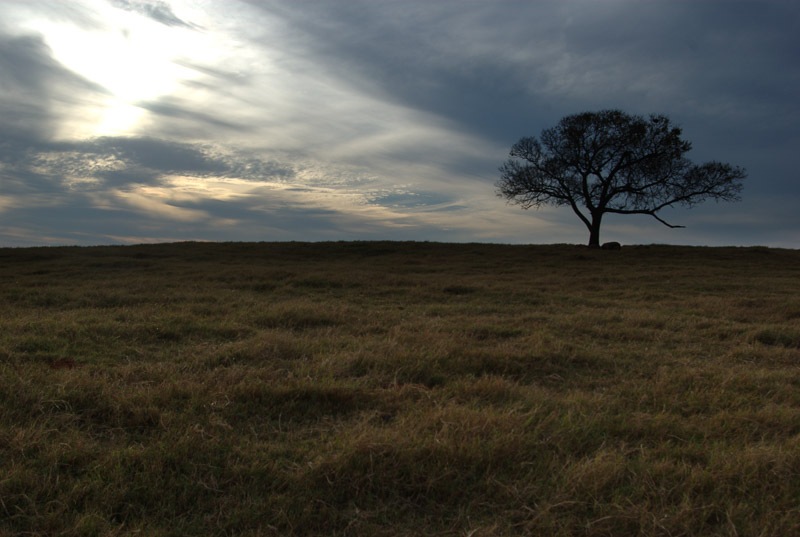
Here’s how Adobe Lightroom shows the image. Notice the thirds grid overlaid on the image. You can see that the tree isn’t quite on the right hand vertical grid and the horizon is pretty well centered.
Now, here’s a treatment with a bit of cropping, highlighting, and contrast adjustment. The tree is now on the right third line and the horizon is on the bottom third. I didn’t do much saturation adjustment, other than to tone down the colors of the grasses to draw the eye to the sky and the tree.
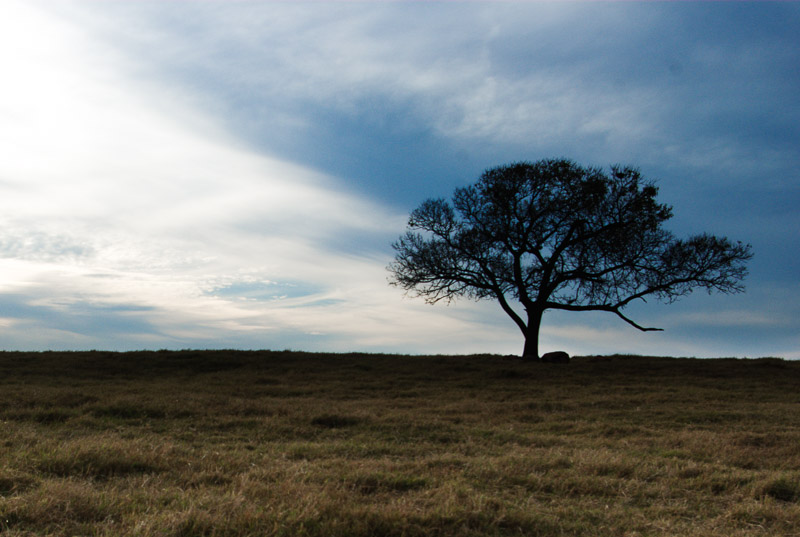
Is it a better photo? It’s certainly more dramatic and possibly tells a story without words. In case you’re curious, here it is, with the same adjustments and with the trunk of the tree centered horizontally and filling the center third of the frame.
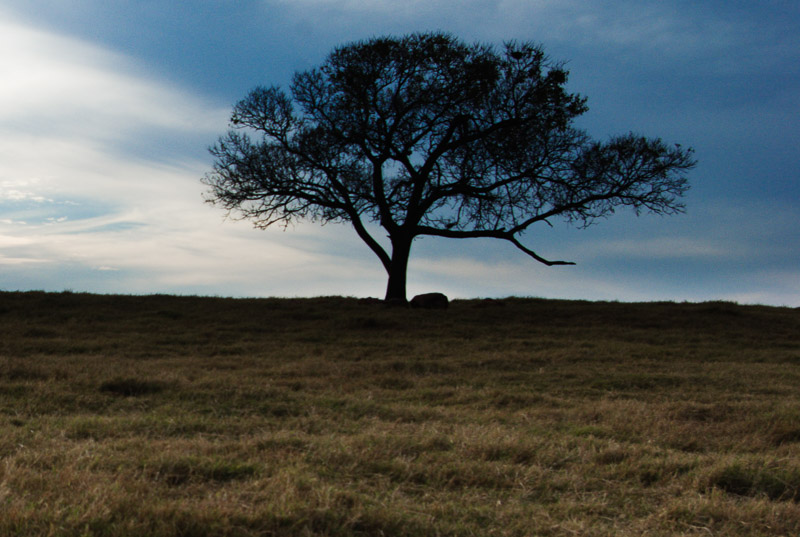
Is it a better shot? For me, it has much less emotional impact.
There’s a psychological foundation to why this rule works but it’s not my purpose to explain it. As I said earlier, it’s a guideline or framework, and not a mandate. If you want to center your subject and it looks good to you, then fire away.
Filters (or the lack thereof)
The manufacturer of your phone wants to take care of every detail of your photos. In fact, every one of them sells their phones on the image quality. One of the top phone OEMs loves to create marketing about how great their cameras are by airing commercials and putting up billboards with incredible photos and videos shot with their phones. It turns out that a billboard is actually a pretty forgiving medium for enlarging a photograph. A better test would be an archival quality print, sized 12x17” (A3 size) at 1200 dpi.
The sad truth is these great photos are just a set of pre-defined post-processing optimizations that each OEM keeps to themselves as a trade secret. The improved skin tones in Google’s Pixel 6 isn’t groundbreaking–it’s just them paying attention to that specific detail.
As part of the phone software manipulation, you’ll get tempted to use built-in filters on the phone. In many ways, these are fine shortcuts, but they limit the precise ability for you to tune the photo colors and exposure the way you may want.
The one real piece of advice I’m going to give on this, and I’ll elaborate in a moment, is to refrain from using filters that over-saturate the colors. It might look great to see all those vibrant greens, yellows, and reds, but they’re not real. They’re trying to trick you into accepting that this is what your eyes really saw, but it’s not. Saturation is a spice–used sparingly, it adds a wonderful flavor, but used slightly too much it ruins the dish.
The RAW Truth
If you’re not supposed to use filters, how do you improve a photo?
Your modern smartphone (post 2015) should have the ability to shoot a photograph in what is called “RAW” mode. This means the file that’s stored is the direct output of the sensor and not interpreted in some way to produce a JPEG or PNG image. With a RAW photo, you can use aftermarket software to do many subtle alterations to the exposure, white balance, and saturation levels that you cannot do on a JPEG image. Depending on the alteration, some of the changes don’t affect the image quality at all. If you have a JPEG image, you’re always adjusting the pixels within the image, because it’s already made a first attempt at interpreting the output of the image sensor.
I know this sounds like a huge leap, and honestly, it is. But, if you want to take and present exceptional images from your phone camera, you’re going to have to learn this step. But, once you learn these steps and you want to go to a DSLR, you’re already 80% of the way there.
When shooting RAW, you’ll have to content yourself that you’ll never have what you need on the phone to get the perfect image. You’ll have to go to your Mac/PC to use software like Lightroom or Photoshop to get the processed image. There is a mobile version of Photoshop that has basic adjustments, but it’s not a replacement for desktop software. You’ll have to set up a workflow where your RAW files can be filtered, processed, and saved as JPEG after you do your tweaking.
An entire book can be written on this subject, so I’ll just say that the concept you’re looking for is called “Digital Asset Management” or DAM. There are many excellent books on it.
What’s the Point?
I’ve explained big concepts, so how do you put them into practice? Here’s a bunch of pointers, sorted by no particular criteria. I hope you’ll find these useful.
-
Stabilize your shot. Holding your phone in your hand while trying to take the photo is just about the worst possible scenario. Your hand is a terrible mount for a camera. Invest in a cheap monopod (or tripod) and a camera bracket. Together, these are less than $30US on Amazon. There are dozens of models and any would be a better solution than your fingers. If you want to buy up, get a $100 gimbal to hold the phone.
-
Use a Timer. While you’re moving your phone to a stable holder, also delay the shot for two seconds if you can. Turn on the timer, press the button, and GET YOUR HANDS OFF THE PHONE. This will remove the vibrations and take a clearly-defined shot.
-
Zoom with your feet. This is one of the oldest pieces of advice for new photographers. Get as close as you safely can to the subject. Don’t rely on the “30X Zoom” on your phone. It’s not real. Even if your phone has multiple lenses, at best you’re getting 3X optical zoom. Those pixels are not as good from far away as they are up close.
-
Roll down the window. Oklahoma has beautiful sunsets. I can’t count the number of photos I’ve seen of a blurry sunset with something in the foreground. What is in the foreground? A splattered bug or the streak of a windshield wiper. Whatever the photographer thought was beautiful at the time has been ruined by whatever was on the window of their vehicle. Aside from the bugs, a window will distort the optics of the shot, so it’s best to just remove that extra bit of glass from the shot if you can.
Follow Up
As I mentioned before, I started this post almost a year ago because a friend really wanted better photos. I spent a few hours, guiding them gently down the rabbit hole and they’ve now moved on to a DSLR and doing great work. A DSLR isn’t for everyone, but with a bit of effort and learning, your phone photos can certainly become more than just snapshots.
Feel free to DM me on Twitter.